• This is Slide 1 Title

    This is slide 1 description. Go to Edit HTML and replace these sentences with your own words. This is a Blogger template by Lasantha - PremiumBloggerTemplates.com...

  • This is Slide 2 Title

    This is slide 2 description. Go to Edit HTML and replace these sentences with your own words. This is a Blogger template by Lasantha - PremiumBloggerTemplates.com...

  • This is Slide 3 Title

    This is slide 3 description. Go to Edit HTML and replace these sentences with your own words. This is a Blogger template by Lasantha - PremiumBloggerTemplates.com...

Sunday, February 28, 2010

ကြန္ျ႔ပဴတာျပင္သမား အတြက္

ကြန္ျပဴတာျပင္ဖုိ႕ရာစိုေက အရင္ဆံုးသတိထားရဖုိ႕အခ်က္

antistatic လက္ပတ္ၾကိဳး (ESD လက္ပတ္ၾကိဳး ) (ground bracelet)။ ။ ကြန္ျပဴတာ ပစၥည္း တိကို ကိုင္ ေရခါ လူကို လံုျခံဳေအာင္ ပစၥည္း တိ က လူမွာ ဟိေရ static charge ေၾကာင္႕ မပ်က္စီးေအာင္ ေဆာင္သင္႕ပါေရ။
ဲျမန္မာနုိင္ငံမွာ ကေတာ႕ မသံုးကတ္ပါ။ System Unit က သံျပားကို ပြတ္ပနာ electrostatic charge ပ်ယ္ေအာင္လုပ္ကတ္ပါေရ။


power supply က ပါ၀ါၾကိဳး ။ ။ power supply က ပါ၀ါၾကိဳး ကိုျဖဳတ္ထားဖို႕ ကို သတိထားပါ။ မျဖဳတ္ထား မိပဲ ဖြင္႕ လုိက္ေက ပစၥည္း တိပ်က္တတ္ပါေရ။

သတိနန္႕ကိုင္ပါ။ ။ system unit ထဲက motherboard , adapter , memory ကတ္တိကို သတိထားကိုင္တြယ္ပါ။ chip တိ circuit တိကို မထိမိေအာင္ သတိထားကိုင္တယ္ပါ။ electro static charge ေၾကာင္႕ ပ်က္စီးတတ္ပါရ။ ၾကာၾကာမခံပါ။


ကြန္ျပဴတာတစ္လံုး ျပင္ေက လုိအပ္ေတ ပစၥည္းတိက

၁။ Phillips Large screw driver : Casing ကို ဖြင္႕ဖုိ႕ ၊ Harddrive အတြက္သံုးဖုိ႕ ျဖိဳက္ပါေရ။


၂။ phillips smaill screw driver: Floppy Drive, CD-ROM အတြက္သံုးဖုိ႕ျဖိဳက္ပါေရ။

၃။ Flathead large screw driver: တစ္ခ်ိဳ႕ Casing တိမွာ သံုးနုိင္ပါေရ။


၄။Flathead small screw driver: အငယ္ screw တိ၊ monitor connector ၊ CPU Fan ကို ျဖဳတ္ေတခါသံုးနုိင္ပါေရ။

Large hex : တစ္ခ်ိဳ႕ Casing တိမွာ သံုးပါေရ။ (ေယေက ေလ႕ အသံုးနည္းပါေရ)


၅။small hex: DB connector ၊ motherboard ေအာက္က ေဒါက္ ေခ်တိ မွာ သံုးပါေရ။

၆။chip puller: ျဖဳတ္တပ္လုိ႕ ရေရ Chip တိအတြက္သံုးပါေရ။ (အခု ေတာ႕ ေကာင္းအသံုးမ၀င္ပါဗ်ယ္)


၇။Grabber tool: ျပဳတ္က်လခ ေရ Screw တိကို ေကာက္ဖုိ႕ အတြက္ ျဖိဳက္ပါေရ ။

၈။Hemostat : Jumper တိက္ု ျဖဳတ္တပ္ လုပ္ဖုိ႕အတြက္ပါ။


၉။magnifying glass: motherboard မွာ ရြီးထားေရ စာတိၾကည္႕ဖုိ႕ ။ Chip ထက္မွာ ရြီးထားေရ စာတိၾကည္႕ဖုိ႕အတြက္ပါ။


၁၀။Flash light: ေမွာင္နီေက သံုးဖုိ႕ အတြက္ ျဖိဳက္ပါေရ။ Flash Light အငယ္ေခ် ဆိုေက ပိုေကာင္းပါေရ။ ယူရစြာ လဲ လြယ္ပါေရ။

(လုိအပ္စြာတိေတာ႕ ဟိဖုိ႕သိပါ) comment နန္႕ ျဖည္႕ပီးကတ္ပါ။

Desktop background Fake

သူငယ္ခ်င္းရိုိ႕ကို စဖုိ႕ Desktop background fake လုပ္ကတ္မယ္။

၁။ ပထမဦးဆံုး Desktop ေပၚမွာ တစ္ခု program မဖြင္႕ပဲ keyboard က Print Screen (button) ကိုနွိပ္လုိက္ပါ။

၂။ Start > Accessories > paint ကို ဖြင္႕လုိက္ပါ။

၃။ paint ထဲမွာ Ctrl+V တြဲနိွ္ပ္ျပီး past လုပ္လုိက္ပါ။


၄။ ေယေက လက္ဟိ ေပၚနီေယ Desktop background ပံုေပၚလာပါလိမ္႕မယ္။ ယင္းဟင္႕ ကို Save လုပ္လုိက္ပါ။

၅။ Desktop > right-click > properties
Desktop Properties ေပၚလာပါလိမ္႕မယ္။ Desktop ထဲက Browse ကိုနွိပ္ ကို္သိမ္းထားေရ ပံုကို ရြီးလုိက္ပါ။

၆။ Desktop > right click > arrange icons by ထဲက Show Desktop icons (check) လုပ္ထားစြာကို ျဖဳတ္လုိက္ပါ။


ေယေက အကြ်န္ရို႕ လုပ္ခ်င္ေရ Desktop background fake ရပါဗ်ယ္။
အခု ေပၚနီစြာ Desktop ေပၚက icon တိေရ ပံုရာ ျဖိဳက္ပါေရ icon အစစ္ အဟုတ္ပါ။

Friday, February 26, 2010

အင္တဲလ္ ရဲ႕ ပထမဆံုး Core ေျခာက္ခု ပါ processor


ဥေရာပ အြန္လိုင္း ျဖန္႕ခ်ီေရး က ပထမဆံုး intel ရဲ႕ six-core processor (desktop အတြက္) ကို ျဖန္႕ခ်ီေရာင္းခ်လုိက္ပါေရ။ဂ်ာမနီ ျဖန္႕ခ်ီေရး က လဲ Intel Core i7-980 Extreme Edition Processor , (Code name "Gulftown") ေဒၚလာ 1483 နန္႕ ျဖန္႕ခ်ီလုိက္ပါေရ။ ေဒ Chip ကေတာ႕ Gamer တိအတြက္ အဓိကထုပ္ စြာျဖိဳက္ပါေရ။ေဒ six-core processor က speed 3.6 GHz ၊ L3 cache က 12MB ၊ ပါ၀င္ပါေရ။ core တစ္ခု စီမွာ thread ၂ ခုစီ ပါပါေရ။ DDR3 memory ကို support လုပ္ပါေရ။Intel ကေတာ႕ ေဒprocessor ကို ေၾကာ္ျငာ ျခင္း မျပဳသိပါ။ Intel ကေတာ႕ အခု အခါမွာ Dual-core , quad-core (core i3, core i5, core i7)(desktop အတြက္) ေရာင္းခ်နီပါေရ။ six-core processor ကို ေတာ႕ server အတြက္ရာ ေရာင္းခ်နီပါေရ။ server အတြက္ six-core processor ကေတာ႕ 7400series code name က Dunnington ျဖိဳက္ပါေရ။ 2008 ခုနွစ္က ထုပ္လုပ္လုိက္ေတ Penryn ကို အေျခခံျပီးလုပ္ထားစြာျဖိဳက္ပါ္ေရGulftown chips အမည္ ဟိေရ processor က ေတာ႕ ပါ၀ါစားသက္သာေရ ပိုမိုျမန္ဆန္ေရ deskop သမားမ်ားအတြက္ အထူးေကာင္းမြန္ေအာင္ ျပဳလုပ္ထားပါေရ။ Data transfer ကလည္း ပိုျမန္ဆန္လာပါေရ။ ေအ chip ကို 32 နာနိမီတာ processor ျဖိဳက္ပါေရ။ အရင္ quad core processor ကေတာ႕ 45 နာနိမီတာ ဟိပါေရ။ေဒ processor ကေတာ႕ ေဒ နွစ္မွာ ပထမဦးဆံုး 32 နာနီမီတာ desktop , laptop သံုးအတြက္ ပထမဦးဆံု ထုတ္လုပ္မူျဖိဳက္ပါေရ

Partition ကို Software သံုးျပီး ေက ပိုင္းမယ္


Partition ကို Software သံုးျပီး ေက ပိုင္းမယ္

ေအ Software ေခ်က portable လဲ ျဖိဳက္ေတပိုင္လြယ္လဲ လြယ္ပါေရ။
ေအ Software ေခ်က ေတာ႕ Hardware Technician တိအတြက္ အထူး သင္႕ေတာ္ ဖုိ႕ထင္ပါေရ။

Software နာမည္က ေတာ႕ Norton Partition magic 8.0 portable


Download

windows xp မွာ partition ဇာပိုင္ ျပန္ပိုင္းဖုိ႕လဲ။


windows xp မွာ partition ဇာပိုင္ ျပန္ပိုင္းဖုိ႕လဲ။

၁။ Strat > Run > compmgmt.msc ရိုက္ထည္႕ပါ။


၂။ Computer Management ဆိုျပီးေပၚလာပါလိမ္႕မယ္။
ကြ်န္ေတာ္႕မွာေတာ႕ C: D: E: ဆိုျပီးေက သံုးပိုင္း ဟိပါေရ။
ကြ်န္ေတာ္လုပ္ခ်င္ စြာက D: E: ကို ဖ်က္ျပီးေက D: တစ္ပိုင္းတည္း ျဖိဳက္ေအာင္လုပ္ဖုိ႕ပါ။


၃။D: partition အေပၚမွာ Right click နွိပ္ျပီးေက Delete Logical Drive ကိုရြိးလုိက္ပါေရ။


၄။ ေဒ Drive ကို ဖ်က္ မဖ်က္မီးပါေရ ။ (မဖ်က္ခင္ ေအ Drive ကနီ ဖုိင္တိအားလံုး ကူးထား ရဖုိ႕ပါနန္း)
Yes ႏွိပ္လိုက္ပါေရ။


၅။ E: မွာလဲ right click ႏွိပ္ Delete Logical Drive ကိုနွိပ္


၆။ ေယေက D: E: partition တိစြာ ပ်က္လား ပါလိမ္႕မယ္။
အခု partition ျပန္ ပိုင္းဖုိ႕ပဲ လုိဗ်ယ္။


ရ။ Free space ဆိုေရ ေနရာမွာ right click ကိုနွိပ္ New Logical Drive ကို ရြီး

၈။ partion wizard ေပၚလာပါလိမ္႕မယ္။

၉။ Next ကိုနွိပ္။

၁၀။ logical Drive (option ) ကိုရြီး Next ကိုနွိပ္။


၁၁။ partition size in MB: 138478 ျပထားပါေရ။
138478 = 138 GB -- ေအဟင္႕ကိုထပ္ခြဲခ်င္ေရဆိုေက ကိုယ္ခြဲခ်င္ေရပိုင္ ဂဏန္းတိကို ေျပာင္းလုိက္ပါ။
မခြဲ ခ်င္ဗ်ယ္ တစ္ပိုင္းတည္း ရာ ထားဖို႕ပါ ဆိုေက တစ္ခု လဲ မေျပာင္းေက႕ပါဖိ။
(လုိခ်င္စြာပိုင္ ခြဲထုတ္လုိ႕ရပါေရ)


၁၂။ အခု ေတာ႕ မခြဲပါဗ်ယ္။ D: တစ္ပိုင္းတည္း ထားဖုိ႕ အတြက္ျဖိဳက္လုိ႕ မေျပာငး္ပါဗ်ယ္။

၁၃။ Drive letter ပီးပါမယ္။ ကိုယ္ က D: ကို မၾကိဳက္ Z ဆိုလဲ ရပါေရ ။


၁၄။ လုပ္ထား ေရ partition ကို format ခ်ပါမယ္။
File System : ကို NTFS နန္႕ ခ်ဖုိ႕လား FAT , FAT 32 နန္႕ ခ်ဖုိ႕ လားရြီးလုိက္ပါ။
Allocation Unit size : ကေတာ႕ Default ပါဗ်ယ္။
Volume Label : ကေတာ႕ Drive ကို နာမည္ ျပီးလုိ႕ရပါေရ။
perform a quick format: ကို check လုပ္ထားဖုိ႕ ဆိုေက quick format လုပ္လားဖုိ႕ပါ။
(ေအနားမွာ တစ္ခု ေျပာခ်င္စြာ က quick format ဆိုစြာ က Drive ကို wipe လုပ္လိုက္စြာပါ။
ရိုးရိုး Format ဆိုေက Drive ကို error စစ္ျပီးေက repair လုပ္လခစြာပါ။)
Enable file and folder compression : ကေတာ႕ ေအDrive ထဲမွာ compress လုပ္ပီးသိမ္းဖုိ႕အတြက္ပါ။


Next ကိုနွိပ္
၁၅။ Finish ကိုနွိပ္။


၁၆။ ေယေက ကြ်န္ေတာ္ရို႕ လုပ္ခ်င္ ေ၇ Drive D: ကို ရပါဗ်ယ္။


(သူငယ္ခ်င္း ရို႕ computer ပညာရပ္ကို ေလ႕လာရင္း ေပ်ာ္ရြင္နုိင္ကတ္ပါစီ)

Thursday, February 25, 2010

Windows XP ရဲ႕ ICS

Server မသံုးတတ္သိေရ User တိအတြက္ windows xp ရဲ႕ ICS (internet connection sharing)

အင္တာနက္ဆုိင္မွာ windows xp ကို server အျဖိဳက္ထားမယ္ဆိုေက

၁။ System မွာ network card 2 card ရွိရပါဖုိ႕။

၂။ Start > Run ထဲမွာ ncpa.cpl ရိုက္ထည္႕လုိက္ပါ။

၃။ Local Area Connection ဆိုျပီးေက ၂ ခု ေပၚလာပါလိမ္႕မယ္
Right click > Rename
တစ္ခု ကို WAN လုိ႕နာမည္ပီး
တစ္ခုကို LAN လုိ႕နာမည္ပီး


၄။ WAN မွာ ADSL Modem ကလာေရ ၾကိဳးကို ထိုး
LAN မွာ Switch က လာေရ ၾကိဳးကို ထုိး

၅။ WAN ကို right click နွိပ္ properties ကိုရြီး


IP address နန္႕ DNS ကေတာ႕ Bagan ကပီးေရ IP address နန္႕ DNS ပါ။
အခု DNS address ကေတာ႕ 203.81.162.22 , 23.81.162.23


(MPT နန္႕ WiMAX ကေတာ႕ obtain an ip address automatically ကိုရြီးပါ။)
(computer တစ္လံုးနန္႕ အင္တာနက္ခ်ိတ္ဆက္စြာကို ေနာက္ေဖာ္ျပပီးပါမယ္)


၆။ WAN right click နွိပ္ > properties > Advanced
Internet Connection Sharing ေအာက္က option နွစ္ခု ကို check လုပ္လုိက္ပါ။

၇။ Setting ကိုနွိပ္ service တိကို အားလံုး check လုပ္လုိက္ပါ။ OK > OK


၈။ LAN ရဲ႕ Ip စြာ auto 192.168.0.1 ျဖိဳက္လားပါလိမ္႕မယ္။

၆။ အျခား Client စက္တိ ရဲ႕ default gateway မွာ 192.168.0.1 ကိုထည္႕ျပီးေက သံုးလုိ႕ရပါဗ်ယ္။

Web Route


WEB နန္႕ ပတ္သတ္ေက စိတ္၀င္စား ေရ လူတိအတြက္ ဇာပို္င္လားရဖုိ႕ဆိုစြာ ကို ေဖာ္ျပထားေရ ပံုေခ်ျဖိဳက္ပါေရ။
web developer လုပ္ခ်င္ေရလူ တိအတြက္ အက်ိဳးဟိဖုိ႕ ထင္ပါေ၇။
source: www.saturngod.com

System Information

ကိုယ္႕ System Unit မွာ ဇာဟင္႕တိတပ္ဆင္ထားေလ ၾကည္႕ခ်င္ေက ေဒ software ေခ်ကို သံုးလုိက္ပါ။
Hardware technician တိအတြက္ အက်ိဳးဟိေရ software ေခ်ပါ။ freeware အမ်ိဳးအစားပါ။ portable အမ်ိဳးအစားလဲ ျဖိဳက္ပါေရ။


Configuration file

CPU-Z uses a configuration file, cpuz.ini, that allows to set several parameters for the program. The cpuz.ini file must be in the same directory as cpuz.exe. It looks like this :

[CPU-Z]
TextFontName=Verdana
TextFontSize=13
TextFontColor=000060
LabelFontName=Verdana
LabelFontSize=13
PCI=1
MaxPCIBus=256
DMI=1
Sensor=1
SMBus=1
Display=1
ShowDutyCycles=0

TextFontName Font used for the information boxes.
TextFontSize Size of the font used for the information boxes.
TextFontColor Color of the font used for the information boxes. Value is expressed in hexadecimal, and consists in a classic Red/Green/Blue color code : RRGGBB
LabelFontName Font used for the label boxes.
LabelFontSize Size of the font used for the label boxes.
Sensor Set to OFF (or 0) disables sensor chip detection and voltages measurement.
DMI Set to OFF disables the DMI (Desktop Management Interface) information. This concerns BIOS vendor and version, motherboard vendor and revision.
PCI Set to OFF disables the PCI information. This disables chipset, SPD and, depending on the hardware, sensoring information.
MaxPCIBus Sets the maximum PCI bus to scan. Default value is 256.
SMBus Set to OFF (or 0) disables SMBus information : SPD, and, depending on the hardware, sensoring information.
Display Set to OFF (or 0) disables the video card information reported in the validator.
ShowDutyCycles Set to 1, switches the alternate clock computation method based on duty cycles. 0 to disable.


ီDownload

Hardware Monitor

ကြန္ျပဴတာတစ္လံုး အလုပ္လုပ္နီေရ အခ်ိန္မွာ hardware ပိုင္းစြာ အခ်ိန္တိုင္းေျပာင္းလဲ နီပါေရ။ ေျပာင္းလဲ နီစြာတိကေတာ႕ အပူခ်ိန္၊ clock speed နန္႕ voltages တိျဖိုက္ပါေရ။
အခု ေဖာ္ျပခ်င္စြာ software ကေတာ႕ Hardware Technician တိ လုိအပ္ဖုိ႕ software ေခ် တစ္ခု ျဖဳိက္ပါေရ။ ေအ sotware ေခ်က ေတာ႕ overheat ျဖိဳက္နီလား ၊ clock speed ကေကာ
မွန္လား ၊ votage တိေကာ မွန္လား လုိ႕ ၾကည္႕လုိ႕ရေရ software တစ္ခုျဖိဳက္ပါေရ။

ေအ software ကေတာ႕ portable အမ်ိဳးအစား 32 bit နန္႕ 64 bit မွာလဲ အလုပ္လုပ္ေတ ေယေကေလ႕ .Net Framework သြင္းထားရဖုိ႕ပါနန္း။


Download

Power supply ေကာင္းမေကာင္း စမ္းသပ္ျခင္း


Power supply ေကာင္းမေကာင္းကို ေတာ႕ ပံုမွာျပထားေရ အတုိင္း အမည္း နန္႕ အစိမ္းကို သံၾကိဳးေခ်တစ္ခုနန္႕ ဆက္လိုက္ပါ။
Power supply fan လည္ေကေတာ႕ ေကာင္းပါေရ။ (အလြယ္စစ္နည္း ပါ)။


ေအာက္က ပံုကေတာ႕ meter နန္႕ ေထာက္ စမ္းရဖုိ႕ အတြက္ ျပထားေရ ပံုျဖိဳက္ပါေရ။

windows 7 ကိုျမန္ေအာင္ လုပ္နည္း

၁။ Windows Switching ျမန္ေအာင္
Windows 7 မွာ Minimize – Maximize လုပ္ေရ အခါမွာ xp နန္႕ ျခားနားစြာကို သင္ သတိထားမိပါလိမ္႕မယ္။ ယင္း animate windows minimize – maximize ကိုပိတ္လိုက္ပါ။

Start ကိုနွိပ္ပါ > “SystemPropertiesPerformance” လုိ႕ရုိက္ထည္႕လုိက္ပါ။ >
Visual Effect (tab) ကုိနွိပ္ပါ > Animate windows when minimizing and maximizing မွာ checked လုပ္ထားစြာကို ျဖဳတ္လုိက္ပါ။ > OK နွိပ္လုိက္ပါ။


၂။ Boot Times ျမန္ေအာင္
ကြန္ျပဴတာ အရင္ တက္လာေအာင္လုပ္နည္း

Start > Run ကိုနွိပ္ပါ (ေအဟင္႕ မလုပ္ခ်င္ေက Win key + R ႏွိပ္ပါ)
Msconfig လုိ႕ ရိုက္ထည္႕လုိက္ပါ။
Boot (tab ) ကိုနွိပ္ပါ။ Advanced options (button) ကိုနွိ္ပ္ပါ။
Number of processors ကို checked လုပ္ ေအာက္မွာ (2,4, 8 တစ္ခုခု ရြီးလုိက္ပါ)
OK ႏွိပ္ > Apply ႏွိပ္
Computer ကို restart လုပ္လုိက္ပါ။


၃။ မလုိအပ္ေတ font တိကို ဖယ္လုိက္ပါ။

Start > control panel ကိုနွိပ္ပါ။
Font (folder )ကို ဖြင္႕လုိက္ပါ။
ယင္းမွာ မလုိအပ္ေတ ထင္ေရ font တိကို ဖ်က္လုိက္ပါ။


၄။ Windows ပိတ္ခ်ိန ျမန္ေအာင္
Windows 7 စြ ာ vista , xp ထက္ပိတ္ခ်ိန္စြာ ျမန္ပါေရ။ ေအဟင္႕ထက္ ပိတ္ခ်ိန္ကို ေလ်ာ႕ခ်ခ်င္ေကေတာ႕

Start > regedit လုိ႕ရိုက္ထည္႕ (Enter)
HKEY_LOCAL_MACHINES
SYSTEM
CurrentControlSet
Control
WaitToKillServiceTimeOut (right-click) > value ေနရာမွာ (12000) ကိုေျပာင္းလုိပ္ပါ။
Default အေနနန္႕ 12000 (12 seconds )ျဖိဳက္ပါေရ။

Computer ကို restart လုပ္လုိက္ပါ။


၅။ Search Indexing ကိုပိတ္လုိက္ပါ။

Start > services.msc လုိ႕ရိုက္ထည္႕ပါ။
Windows Search ကို (right – click) နွိပ္။
Startup type မွာ Disabled


၆။ Toolbar
Windows 7 မွာ Taskbar Thumbnail previews စြာ လွပေရ feature တစ္ခုပါ။ ယင္း thumbnails ျပသခ်ိန္ကို ေလ်ာ႕ခ်နည္းပါ။

Start > regedit ရိုက္ထည္႕ပါ ။ (open registry Editor)
HKEY_CURRENT_USERS
Software
Microsoft
Windows
CurrentVersion
Explorer
Advanced
ညာဘက္မွာ New >DWORD ကိုရြီးပါ။
ThumbnailLivePreviewHoverTime လုိ႕ရိုက္ထည္႕လုိက္ပါ။
(Right-click) ThumbnailLivePreviewHoverTime
Modify ကိုရြီးလုိက္ပါ။
Base ေနရာမွာ Decimalကိုရြီးလုိက္ပါ။ (200) (0.2) seconds Thumbnail ျပသခ်ိန္ ၾကိဳက္ပို္င္ ရိုက္ထည္နုိင္ပါေရ။ Restart လုပ္လုိက္ပါ။


၇။ System ရဲ႕ အသံကို ပိတ္လုိက္ပါ။
သင္႕မွာ System sound လုိအပ္လား။ မလုိအပ္ေက ပိတ္ထားပါ။

Start > mmsys.cpl လုိ႕ရိုက္ထည္႕ပါ။
Sound (tab)မွာ No Sounds ကိုရြီးပါ။


၈။ မလုိအပ္ေတ Startup program တိကုို ဖယ္လုိ္က္ပါ။

ေတာ္ေတာ္မ်ားမ်ား program တိစြာ windows တက္လာစြာ နန္႕ တခါတည္းတက္လာပါေရ။
ေအဟင္႕စြာ bootup time ကိုၾကာစီပါေရ။

Start> msconfig လုိ႕ရိုက္ထည္႕
Startup (tab) ကိုနွိပ္
မတက္ခ်င္စြာ program တိေနရာမွာ အမွာျခစ္ ျဖဳတ္လုိက္ပါ။


၉။ Windows Aero themes ကို ေျပာင္းလုိက္ပါ။
Windows Aero themes စြာ windows vista , 7 မွာ ပါေရ လွပါေရ themes တစ္ခုျဖိဳက္ပါေရ။

Desktop ကို right-click နွိပ္ > Personalise ကို ရြီး
Window color (tab) ရြီး
Enable Transparency (uncheck)
Open classic appearance properties for more color options ကိုနွိပ္
Standard or Basic theme ကို ရြီးလုိက္ပါ။


၁၀။ Services တိကိုပိတ္လုိက္ပါ။
ေအဟင္႕ကေတာ႕ ဇာ services က ဇာအလုပ္ကို လုပ္ေဆာင္စြာလဲ သိရဖုိ႕ပါ။

Start > control panel >
Administrative Tools >
Services


မွတ္ခ်က္။ ။ windows အလုပ္လုပ္စြာ နည္းနီခါမွ သံုးဖုိ႕ပါ။

Windows 7 Feature and Edition

Windows 7 ရဲ႕ feature တိစြာ Windows 7 ရဲ႕ Edition ေပၚမွာမူတည္ပါေရ။ Microsoft ေရ စ်ီးနွံဳးသက္သာေရ Edition တိမွာ Feature တိ အနည္းထည္႕ျပီးေက စ်ီးနံုးမ်ားစြာ Edition တိမွာ Feature တိအမ်ားထည္႕ပီးထားပါေရ။
ေအ chart ကေရ Edition အလုိက္ Features တိကြဲလခစြာ ကို ေဖာ္ျပထားပါေရ။

Saturday, February 13, 2010

system properties logo ထည္႕နည္း

၁။ 180 (wide) x120 (high) pixels ဟိေရ ၾကိဳက္ေတ logo ေခ်တစ္ခုကို photoshop နန္႕လုပ္လုိက္ပါ။
ျပီးေက oemlogo.bmp လုိ႕သိမ္းလုိက္ပါ။
ယင္း oemlogo.bmp ကို C:\windows\system32 ထဲမွာ ေျပာင္းသိမ္းလုိက္ပါ။ ကုိယ္႕ကြန္ျပဴတာမွာ windows ကို D ထဲမွာတင္ထားေက D:\Windows\system32 ျဖိဳက္ပါေရ။

၂။ support information အတြက္က
ေအာက္မွာ ျပထားေရ စာသားအတိုင္း notepad ထဲမွာကူးပါ။

[General]

Manufacturer=Arakan PC
Model=ShowCase

[Support Information]
Line1=” ”
Line2=” For support”
Line3=”"
Line4=” Some text to demonstrate the XP System Properties logo”
Line5=” Windows XP Tips and Tricks ”
Line6=” Arakan IT professional”
Line7=”"
Line8=” +1 (888) 000-00000 (voice)”
Line9=” +1 (888) 000-00000 (fax)”

oeminfo.ini လုိ႕ေျပာင္းသိမ္းလုိက္ပါ။
ေအဖုိင္ကိုလဲ C:\windows\system32 ထဲေျပာင္းသိမ္းလုိက္ပါ။

User Account password ကို command ကနီ ပီးျခင္း

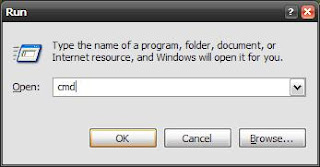
၁။ Star ထဲက Run (Win key+ R)

၂။ Run box ထဲမွာ cmd လုိ႕ရိုက္ထည္႕ Enter နွိပ္

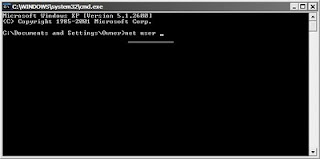
၃။ command prompt ထဲမွာ net user လုိ႕ရိုက္ထည္႕


ေပၚလာစြာ နာမည္တိစြာ ကိုယ္႕ကြန္ျပဴတာမွာ ဟိေရ ကြန္ျပဴတာ user name တိျဖိဳက္ပါေရ။

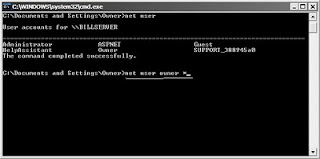
၄။ net user owner *


owner (ကိုယ္႕ကြန္ျပဴတာရဲ႕ username)
* (password ရိုက္ဖုိ႕အတြက္ ပီးခစြာ တစ္ခါတည္းရိုက္ထည္႕ေကေလ႕ရေရ)

Password ကိုရိုက္ထည္႕ေက တခုေလ႕မေပၚပါ။ ေယေကေလ႕ မွတ္ထားပါေရ။

ျပီးေက ရိုက္လုိက္ေတ key ကိုျပန္ ရုိက္ထည္႕လုိက္ပါ။

၅။ The command completed successfully.ေပၚလာပါလိမ္႕မယ္။

ကြန္ျပဴတာကို Restart (reboot) လုပ္လုိက္ပါ။

DSL (ADSL ) ဇာပိုင္ အလုပ္လုပ္လဲ

အကြ်န္ရုိ႕ အင္တာနက္ခ်ိန္ဆက္ေတ အခါ မွာ အကြ်န္ရို႕ Modem , ရံုးက LAN , cable modem ဒါမွမဟုတ္ DSL connection , အျခား အရာ တိ ယင္းဟင္႕တိ ကို ျဖတ္ျပီးေက ခ်ိတ္ဆက္ရပါေရ။ အခု ေျပာခ်င္စြာ ယင္းအထဲက DSL (Digital subscriber line )လို႕ေခၚေရ အင္တာနက္ လုိင္း၊ ေအဟင္႕စြာ ဖုန္းလိုင္းကိုျဖတ္ျပီးေက အလုပ္လုပ္ေဆာင္ေရ လုိင္းတစ္လုိင္းျဖိဳက္ေတ ၊ ျမန္ဆန္ေရ connection အမ်ိဳးအစားလဲ ျဖိဳက္ပါေရ။

DSL ရဲ႕ ေကာင္းေရ အခ်က္ ဆိုးေရအခ်က္ေခ်တိကို ေဖာ္ျပပါမယ္။
ေကာင္းေရ အခ်က္

  • ဖုန္းလုိင္းကို အသံုးျပဳျပီးခ်ိတ္ဆက္ထားေကေလ႕ ယင္းဖုန္းလုိင္းကို သံုးလုိ႕ရပါေရ
  • regular Modem ထက္ျမန္ေရ
  • ဖုန္းလုိင္းကို အသံုးျပဳေရ အတြက္နန္႕ ေနာက္ထပ္ ၾကိဳးတိ ခ်ိတ္ဆက္ဖုိ႕အတြက္ ေငြမကုန္ဗ်ယ္

မေကာင္းေရ အခ်က္ေခ်တိကေတာ႕

  • Central office နန္႕ နီးေက connection ျမန္ျပီးေက Central office နန္႕ ၀ီးေက connection ေနွးပါေရ
  • Data တိကို ပို႕စြာထက္ လက္ခံစြာမွာ ျမန္ေရ (sending data ထက္ receiving data ကပိုျမန္ေရ)
  • ေအ service ကို ေနရာတကာမွာ မရနိင္ပါ။
Asymmetric DSL (ADSL)
အခု အခါမွာ အိမ္ေရာ ရံုေရာ ေတာ္ေတာ္မ်ားမ်ားမွာ ADSL လုိင္းကို ခ်ိတ္လာကတ္ပါဗ်ယ္။ ADSL ေရ Internet user တိ browsing လုပ္ဖုိ႕ download လုပ္ဖုိ႕ information တိကို ပို႕ဖို႕ တင္ဖုိ႕ လုပ္လုိ႕ရေရ frequencies လိုင္း ျဖိဳက္ပါေရ။

ADSL လုိင္းက ေတာ႕ central office နန္႕နီးေရ user တိစြာ central office ထက္ ၀ီးစြာလူတိထက္ ပိုျမန္ပါေရ။ ယင္းေတာ႕ နန္႕ ADSL စြာ distance-sensitive technology တစ္ခုျဖိဳက္ပါေရ။ connection ရဲ႕ အလ်ားရွည္လီ connection ျမန္ဆန္မူနွံဳး က်လီျဖိဳက္ပါေရ။ ADSL လုိင္းရဲ႕ အကန္႕အသတ္က ေတာ႕ central office ပတ္၀န္းက်င္ ေပ 18000 (5460 meter) ထိရာကန္႕သတ္ထားပါေရ။

ADSL technology ေရ 6000 ေပ (1820 မီတာ) အတြင္းမွာ 8Mbps (တစ္စကၠန္႕မွာ 8Mb) အထိ downstream (receive) ရနုိင္ပါေရ။ upstream speed ကေရ (send) 640 kbps ထိ ရပါေရ။ တခ်ိဳ႕ ေနရာတိမွာ ADSL2 ADSL2+ ရေရေနရာတိမွာဆိုေက downstream (12 Mbps) upstream (1Mbps)ထိရနုိင္ပါေရ။ ADSL2+ ကေတာ႕ ယင္းဟင္႕တိထက္ ပို္ေကာင္းပါေရ။

DSL မွာ အကြာအေ၀း သတ္မွတ္ခ်က္ ဟိေရ telephone လိုင္းကေတာ႕ သတ္မွတ္ခ်က္အဟိ အဇာျဖိဳက္လုိ႕ပါလဲ ။ phone line မွာက loading coil ဆိုေရ small amplifier ကို ဖုန္း company တိမွာ သံုးပါေရ ယင္းဟင္႕က voice signal တိကိုျမန္ဆန္ေအာင္လုပ္ပါေရ။ loading coils ေရ ADSL signal နန္႕ သဟဇာတမျဖိုက္ပါ။
ADSL ရဲ႕ ဆက္သြယ္မူပစၥည္းတိကို customer ဘက္ကနန္႕ ISP , phone company ဘက္ ဆုိျပီ နွစ္ပိုင္းခြဲထားပါေရ။ customer က ပစြည္းကို DSL transceiver ၊ DSL services provider ဘက္က DSL Access Multiplexer (DSLAM) ျဖိဳက္ပါေရ။


Transceiver (Customer end)
DSL transceiver ကို DSL Modem လုိ႕ေခၚပါေရ။ ISP ရို႕ phone company တိက ေတာ႕ ATU-R လုိ႕လဲ ေခၚကတ္ပါေရ။ ေအဟင္႕ကို ဖုန္းလုိင္းနန္႕ ခ်ိတ္ဆက္ပါေရ။ DSL Modem နန္႕ တြဲသံုးလို႕ေရ connector တိကေတာ႕ USB , 10 Base T ရို႕ ျဖိဳက္ပါေရ။

DSLAM
DSLAM စြာ DSL အတြက္ access provider ျဖိဳက္ပါေရ။ DSLAM ကနီ connection ေတာ္ေတာ္မ်ားမ်ား ကို ခ်ိတ္ဆက္နိင္ပါေရ၊ ျပီးေက DSL အမ်ိဳးအစား ကြဲမ်ားကို လဲ ခ်ိတ္ဆက္နုိင္ပါေရ။ DSLAM ဟိစြာေနရာကို တနည္း အားျဖင္႕ central office လုိ႕ လဲ ေခၚပါေရ။